Tuesday 8 May 2012

JANNAT 2 MOVIE FREE DOWNLOAD

JANNAT2 MOVIE FREE DOWNLOAD IN SINGLE LINK

MOVIE NAME : JANNAT 2

CASTING : IMRAN HASHMI

MUSIC : PRITAM

DIRECTOR : KUNAL DESHMUKH


SCREEN SHOTS


DOWNLOAD LINK


Sunday 6 May 2012

NOKIA LUMIA 800

NOKIA LUMIA 800 PRICE & REVIEW


NOKIA 'S FIRST WINDOWS BASE MOBILE PHONE IN TELECOM MARKET . IT HAS A GOOD RESPONSE FROM PUBLIC .

NOKIA 'S HIGH RANGE MODEL OF NOKIA LUMIA 800 IS , IT HAS RICH LOOK OF THIS HANDSET .

FEATURE OF NOKIA LUMIA 800

SUPPORT 2G AND 3G NETWORK

MICROSOFT WINDOWS 7.5 MANGO O.S SUPPORT

1.4 GHZ PROCESSOR

512 MB RAM

SMS,MMS,EMAIL

WAP2.0,XHTML,HTML

INDIAN MARKET PRICE : 23,900 ONLY

PHONE'S SPECIALITY


NEW LOOK OF YOUR FACEBOOK ACCOUNT

CAMERA RESULTS

NO VIRUS AFFECTED

PHONE'S MISS POINT


NO VIDEO CALLING AVAILABLE ON PHONE

NO MEMORY CARD SLOT AVAILABLE

NO BLUETOOTH POINT AVAILABLE IN THIS PHONE


Saturday 28 April 2012

LATEST TIKONA USERID OR PASSWORD

LATEST USER ID OR PASSWORD FOR TIKONA

» User Name  : 110233212

» Password    : google
» Username : 1105889642
» Password  : 9819898
»Username : 1102685826
»password  : 9874524
» Username : 1106160464

» Password  : 123459876
» Username : 1102338801

» Password : 9986447699

Thursday 26 April 2012

Add Meta tags to your Blog


Open the Blogger.com

Login In Your Blogger Account .

Go to Design (Layout) > Edit Html > And Mark the box  "  Expend Widget Templates "

Then Find In Your Blogger Html :

"<b:include data='blog' name='all-head-content'/>"

 After You Find it Then You have Add to this line Below

<meta content='DESCRIPTION HERE' name='description'/>
<meta content='KEYWORDS HERE' name='keywords'/>
<meta content='AUTHOR NAME HERE' name='author'/>

Now You can Save changes and You Have Shown the Changes In Your Preview .


Send Free International SMS though Facebook

Free Send International Sms From Your FaceBook Account .


1 . First Sign In Your Facebook Account .

2 . Click the Url : http://apps.facebook.com/chatsms/
3. Allow and Grant Permission to Access Your data Profile .

4 . You will Show The Page  .


5 . Select Your Country Code and write the Cell Number Of your Freind and Send a Message Him / Her .

6 . When You Send an message then Sometime you show the Eror But Wait Some Minute Your Message Has Been Sent .

7 . Just Enjoy the Tricks .

Wednesday 25 April 2012

Make a Calculator In C++

HOW TO MAKE A CALCULATOR IN C++ ??


Answer :


#include <iostream>
#include <cmath>
#include <String>

Using Namespace std;

int main()

{
Double number;
double calculation;
double multiply;
double subtract;
double add;
double sum;

calculation = number*number;
calculation = number/number;
calculation = number-number;
calculation = number+number;


sum = clculation;

cout<<"Enter Calculation"<< Endl;
cin>> calculation;
cout<<sum<<endl;

return 0;
}

COMMANDS FOR CONFIGUIRING POST

"WINDOWS SERVER 2008 COMMANDS FOR CONFIGUIRING POST & INSTALLATION SETTING"


Changing the Administrator Password

[Net user administrator*]

Configuiring a Static IPv4 address

[Netsh interface IPv4]

Configuiring a Static DNS Server

[Netsh interface IPv4 add ansserver]

Activating the Server

[cscript C:\Windows\system32\slmgr.vbs-ato]

Joining the Computer to a Domain

[Netdom join]

Adding Roles,Components,or Features

[Ocsetup.exe]

Displaying Installed roles,Components or Features

[Oclist.exe]

Enabling Remote Desktop Features

[cscripts C:\Windows\System32\Scregedit.wsf/AR 0

Promoting A DC

[Dcpromo.exe]

Configuiring DNS

[Dnscmd.exe]

Configuiring DFS

[Dfscmd.exe]

WINDOWS SERVER 2008 INSTALLATION

HOW TO INSTALL WINDOWS SERVER 2008 ?


Windows Server 2008 Provides the following two general types of installation .

  • Server Core Installation
  • Full Sever Installation .


SYSTEM REQUIREMENT FOR INSTALLING WINDOWS SERVER 2008


PROCESSOR : MINIMUM 1 GHZ (RECOMAMNDED 2 GHZ )


RAM : MINIMUM 512 MB (RECOMNDED 2 GB )


By Following Steps to Install the Windows Server 2008

1 . Start the Computer and Insert the Disk Of windows Server 2008 in to Dvd Drive .

2. Reboot the Computer and after computer boots from the DVD,the Install Wizards appears , as shown in Image .

3. Select The Language For Installation , the time and Currency Format , the Keyboard layout that is applicable for your Computer . By Default Set to English  (US) Respectively .

4. Click the Next Button the Installa Windows Wizard now Contains an install now Button .

5. Click the Installation Button and Start the Windows Server 2008 Process .

6. Enter the product activation Key now or Ensure that the automatically activate .Windows when i m online Check Box is Selected if you want windows automatically activate the product key after the installation process is complete .

7. Click the next Button to Continue .

8. Select the Windows server 2008 Enterprise  (full Installation) option and select the i have selected the edition of windows that i purchased it .

9. Click the Next Button to Continue .

10 . Select the "Custom Option "

11. Click the Next Button . the Installing Windows Page Appears , as shown in image .

The Installing windows page shows the progress of the installation of windows server 2008 .the computer reboots once or twice during the installation process .after the installation of windows server 2008 is complete , a message is displayed starting that the installation of windows server 2008 is complete .

12. click the ok button the login screen for the administrator user account appears , as shown in image .
Enter a password for the administrator user account in the both the  new password and confir password tex boxes and press enter kry .

Click the ok Button .

Thats a installation of Windows Server 2008 .


USING ADVANCE SECURITY SETTINGS

"HOW TO DO ADVANCE SECURITY SETTINGS ?"


You can Perform the following Steps to use the Advance security Settings Dialog box for an individual group :

1 . Open the Active Directory Users and Computers snap-in.

2. Select View - Advance Features in the Menu Bar .

3. Right-Click the Group in an OU and Select Properties from the Context menu . the properties dialog box menu Opens .

4. Select the Security Tab in the properties DialogBox .

5. Click the Advance button . The Advanced Security Setting DialogBox Open .

6. In the Advance Security Setting Dialogbox , Click the Add Button. The Select User,Computer,or Group Dialog Box opens .

7. Enter the Group Name in the enter the object name to select text box and then click ok button.The Permission Dialogbox Open .

8. In the Permission Entry Dialogbox , Select the Properties Tab .

9. Select this object and all Descendent objects in the apply or Drop Down list .

10. Select the Allow check Boxes for the read Members and Write Members Permission In the Permission List Box .

11.Click the Ok button to close the Permission Dialogbox .

12. Click Ok Button to Close the Advance Securtity Dialogbox .

13.Click OK to Close the Properties Dialog Box .

By Following Steps ,You Can Delegate the Management of a Group's Membership to Another Group By Advance Security Setting .


USE OF CSVDE COMMAND

WHAT IS USE OF CSVDE COMMAND ?


The CSVDE command is used to import and export data from and export data from and a.csv file .

You can use the CSVDE command to create a new Group and then finally import the file in to AD.

The Syntax of Using the CSVDE command is :

CSVDE -i -f "filename" [-k]


In the Preceding Syntax :

  • -i : Specifies the Import mode . The Default mode of the .csv file is export mode .
  • -f : Precedes the file Name .
  • -k : Ensure that the process of importing contonues even of erors are encountered .

USING THE CSVDE COMMAND

Lets Perform Following Steps , And Create a Newgroup by the Using CSVDE Command

1--- Open the Notepad
2--- Type the Following Lines In Notepad .

objectclass,SAMAccountName,DN,member
group,writers, "CN=writers , DC=dreamtechpress,DC=net"

Save the Notepad File as "Newgroup.csv" . You Should Remember to Enclose the the Filename Within Quotes , otherwise ,notepad will add a .txt extension .

After the open Command Prompt "CMD" and move to the location where you have saved the .csv file .

Execute the script by typing following command in the command prompt :

CSVDE  -i -f Newgroup.csv


Open the Active Directory Users and Computer snap-in.You can See that a new group writers is created .

in this way , you can create more groups in AD by Using the CSVDE Command .

Saturday 21 April 2012

Fast Download Latest Movies From Mobile

"How Can Fast  Download a Latest Movies From Mobile ?"


First Open Your Fastest Browser Your Mobile .

First Clear the all History and Download .

After You Do it Properly then You Have to Restart Your Mobile Because Your Setting Has Been Successfully Saved .

Now Click Here  Download Latest Movies

Now Choose to Which Movie You Can Download Click on the Movie Name and Your Download Starting Successfully .

Saturday 14 April 2012

Recover Deleted Files With Shift + Delete Key

"How Can I Recover the deleted Files ?"


By Mistake you Have File Deleted With Shift Delete . If you have Delete file with Delete Key Then You Restore From Your Recyclebin .But If you Deleted Files With Shift Delete . There was Helpful this Article .


When a File is deleted from Your Computer , its contents are not fast destroyed . Windows Symply marks the Hard drive Spaces as being available for use by changing one Character in the file table . If you manage to start an undelete process before windows overwrites that part of hard disk with new files . you acn set that flag back to "on"and get your file .

As i know,You can download some free Recovery Software as follow to Recover Deleted Files .

* Panda Recovery

it actually Recovers Files Permananetly Removed from Recycle bin, Files Originally Deleted Using Shift + Delete Keys bypassing Recyclebin and Files Deleted From CMD "DOS " Panda Recover Files to Allows you to find and Recover Recoverable Deleted Files From NTFS formatted Volumes,regardless of their type .

Click Here to Download  : "PANDORA RECOVERY"

MAKE YOUR COMPUTER FASTER

"HOW TO MAKE YOUR COMPUTER FASTER AND RELIABLE ?"


6 TIPS  TO MAKE YOUR COMPUTER FASTER .


* Remove Spyware,&Help Protect Your Computer From Virus .


Spyware Collects Information Without Letting You Know and Without Asking Your Permission .
From the Website you Visit to User names and Password Spyware can put you and your confendential Information at Risk .

Download Microsoft Security Essential Microsoft Essrntial Security Is Free Malware Spyware Antivirus . It helps to Remove Spyware .

* Free Disk Space .


Free Disk Space On Your Harddisk to Improve the Fast Perfomance Of  Your Computer .


  • Remove the temparory Files .
  • Delete Downloaded Program Files and Apps , Such as Active X and Java Applets .
  • Empty Recycle Bin.
  • Delete Unusabe Files .
  • Uninstall Unuse Programs.
  •  

    * Speed Up Disk Data .


    Disk fragmantation slows the overall performance of your system . when files are framented,thecomputer must search the hard disk as a file is opened .

    Disk Defragment is a windows utility that consolidates fragmented files and folders on your computer 's hard disk so that each occupies a single space on the disk .

    •  When to Run Disk defragment ?

    •  When You Add Large Number Of Files .
    •  Your Free Space 15 Percent or Less .
    •  You Install a new Programs or a Windows New Version .

    * Detect and Repair Erors .


    Run the Eror Checking Utility .

    Close all Open files .

    Click Start,and then Click Computer

    In the Computer WindowRight-click On Computer Prorpeties .

    Go to Tools Tab .

    Click th Check Now Button .

    In the Check Disk Dialog Box, Select the Scan for and Attempt Recovery of Bad Sectors Check Box,and then Click Start.

    If Bad Sectors are Found,Choose Fix them .

    * Learn About Ready Boost .


    If you are using windows 7 or windows Vista,You can Use to ReadyBoost to Speed up Your System. A Concept in adding memory to a System,it allows you to use non volatilr Flash Memory - like USB Flash Drive or Memory Card to Improve Performnce without having to add additional Memory.

    How to do this "About Ready Boost "

    * Upgrade to WINDOWS 7


    If you try all the Previous remedies and Your Computer still is'nt as fast as you would like to it to be , you May want to consider Updating to Windows 7 .

    Click Here " How to Your Pc Can Run Windows 7 "


    @Sannidhey7


    Thursday 12 April 2012

    PERMISSION TO FOLDER & DISKDRIVE

    "HOW TO GIVE A PERMISSION FOLDER & DRIVE ?"


    If you wish to Lock Your Folder Don't Download Any Software For Folder Securities .

    Just Doing This Step And You can Give a Permission to Folders And Drives .

    Instructions :-

    * First Open the My Computer .

    * Go to Tools > Folder Option .

    *Go to View Tab .

    * Go to Under and Click On " Use Simple File Sharing" ["Recomanded"]


    * Now Go to Folder Location and Right Click on Folder and Go to Properties .

    * Select Security Tab .

    * Click on to all Permission "deny" .

    * Now Click Apply and Ok .

    * Now You can Click On your Folder .

    *You Show the message "Access is Denied "


    If you wish to Open this Folder Just Doing this Instruction Below .

    * Go to My Computer .

    * Go to Tools Tab > Folder Option .

    * Remove the Click On "Use Simple File Sharing " (Recomanded )

    *After Go to Folder Properties .

    * In " Deny" Remove the Click and Go to Advanced .

    * Click Apply and Ok.


    Now You Can Acces Your Folder .

    Enjoy the Tricks .


    @Sannidhey7


    Recover all Files In Windows 7


    "Recover Files In Windows 7"

    When Your Computer affected the Virus and you loose some data then you can Backup Your data .

    *  First Press the Windows Button and go to Control Panel .

    * Click On the Backup and Restore link .


    * When You First time backup Then You can Show Like This logo


    * Its now Starting a Backup in Windows 7


    * If you have a backup Schedule on You will see "Turn Off Schedule" link in the Left panel , Click On it to Disable the Schedule .


    *If the backup Schedule is Off You Can show Turn on schedule link , Enable It .


    Now You have  Done Backup Your Backup.

    @Sannidhey7

    WINDOWS XP PRODUCT KEYS

    "100 % Works Windows XP 2 Product Keys "


       WGP2M-G8M6T-BT7D4-P7RY7-27K76

      VYKFM-8WQD3-PQC2R-MB9YV-X3JFG

      K2KB2-BDBGV-KP686-D8T7X-HDMQ8

      DVK7R-DYF44-8YTC8-T4W2P-KG3X8

      MRX3F-47B9T-2487J-KWKMF-RPWBY

      QC986-27D34-6M3TY-JJXP9-TBGMD
     
      CM3HY-26VYW-6JRYC-X66GX-JVY2D

      F4297-RCWJP-P482C-YY23Y-XH8W3

      HH7VV-6P3G9-82TWK-QKJJ3-MXR96

      HCQ9D-TVCWX-X9QRG-J4B2Y-GR2TT

    @Sannidhey7


    Windows XP Installation Eror

    " When You Format the PC / Laptop  You Got An Eror In Blue Screen "


              When You Install New Windows XP , Sometine We Got An Eror In BlueScreen


            If You are Trying to Install Windows XP In Your Laptop , Please Be Sure that You have Put the Hard Drive on "Compaitibility" mode In Bios which Was defaulted to "AHCI" . Otherwise You Will Got an Eror in BlueScreen .

    Note : Compaitibility is also known as IDE .


    If You Shortout this Eror You Needed Some Setting From Bios .

    * Press F2 When Startup the Boot Computer

    *Select Config thrn Serial "ATA / SATA "

    * Change Controller Option IDE

        Do this 3 Steps You Don't Show a Blue Screen 100% Working .

    @Sannidhey7


    CREATE A PARTITION IN WINDOWS 7


    "Create a Partition Without Formatting In Windows 7 "


    How to Create partition in windows 7


    * First Go To My Computer .

    * Right Click and go to Manage .

    * Now Go to Disk Management

    * You Can Show Your Hard drive Now You have To Choose How much size on Your disk .

    * Now Right Click on unallocated Volume .

    * Howmuch Size you want on your disk Drive that You enter the number in MB Size

    * Create a Name of Your New Volume .

    * Now Go to Diskmanagement You Can Show Your Partition If You have Created .


    If you Have All the Space In One Drive And You Want to Free Space taken From there .


    Just Do this Step.


    * Press Windows Button

    * Click On Search Button and Type .

    *" Diskmgmt.msc "

    * Now You Show The Diskmanagement Windows .

    * Now You Can Show the Only One Drive and Other But it is not Accesable .

    * Now You Have To Right Click On Your Main Drive When all Space arrived for Harddrive .

    * Click On The "Shrink Volume" Option .

    * You Have Shown to the New Dialogbox .

    * Now Write the size You want to Unallocate .

    * After a Minute you Have want to space are Unallocated Now Enjoy Your Windows 7


    '' Don't Forget Say Me Thanks .''

    @Sannidhey7

    Wednesday 11 April 2012

    HOW TO ASSEMBLED A PC


    How to Assembled A Motherboard   ?

    I m Showing You an Image How to Assembled a PC


    This type A Build  a PC Not So Hard ...      

    @Sannidhey7                            

    WHAT IS HTML ?

    "Learn HTML Easily "

    What is HTML ?

    HTML Pure Defination

     "This is a Language that Web Pages are Written in . If you want to crear really Great Webpages then you will needed to learn this . As far as Computer Languages go this Easiet to to Learn ."

    HTML Is A Describe the create a website Language .
    HTML Means " Hyper Text Markup Language "
    A Markup Language is a Set of Markup Tags .
    HTML uses Markup tags Describe a Websites .
    HTML Markup Tags are Usually  called HTML Tags .
    HTML Keywords are Surrounded By Angel Brackets . < >
    HTML Tags are Normally In Pair . Like <b> </b>
    The First Pair Is Starting Tag and Second Pair Is Ending Pair .
    Start and End Tags are also Known as Opening Tags and Closing Tags .
    HTML Documents Describe Webpages
    HTML Documents Contain HTML Tags and Plain Tags .
    HTML Document Are also called a Webpages

    With HTML You can Create Your Website . Like Its Your Dream Website Its So Easy To Learn If u Want to Learn HTML Languages

    Comment Below i m Sending All the HTML Lesson In Hindi,Gujarati, And English at Your Mail Address ..


    @Sannidhey7

    REMOVE WINDOWS XP IN APPLE


    "How to Uninstall Windows XP From  Apple MacBook ?"


    When You Installed the Windows XP from MacBook BootCmp then u Create a Separate Partition  on your harddrive for your Windows XP Installation . If You wish to Uninstall the Windows XP from your Macbook then first you should to Removing partition Permenantly.Clear or Delete all the Files,Folders and Programs . How to do this thats Instruction Is below ...


    INSTRUCTION

    *  Recover Your Useful data From Windows XP .

    * Start up the Computer in Mac OS X and Log in. Quit any Applications that open at startup .

    * Go to the "Applications" folder Open the "Utilities" folder and Double Click on the "Boot Camp Assistant "

    * Choose "Restore the Startup Disk to a Single Volume " from the list of Options . Click the "Continue" button to Remove Windows XP From Your Macbook .

    Now Restart Your MacBook and Show your Windows XP Fully Uninstalled from Your Apple MacBook .

    @Sannidhey7


    Tuesday 10 April 2012

    INSTALLATION WINDOWSXP IN APPLE MACBOOK


    "HOW TO INSTALL WINDOWS XP IN IN APPLE MACBOOK ?"


    * Install Windows XP in Apple Macbook With "BOOTCAMP"

    *  Boot Camp Utility is Available on Macbook Computers Lets you both Mac OS X and Microsoft Windows XP natively on your Macbook . The Utility was introduced when apple transitioned to Intel Processor in 2006 and is in turn, compaitable with all intel based Macbook Notebooks.


    * Now Show thw How To Install Windows XP In Windows XP with "BOOTCAMP"

    *   Update Your Installation of Mac OS X Click the "Apple" logo in the upper - left corner of the screen and select "Software Update " to install  available Updates to mac OS X Apple Recommends having the most recent version of Mac OS X to install boot camp.

    *  Launch the Boot Camp Assitant in Mac OS X . Log in using an administrator account and open  "Macintosh HD " Open the Applications foldersband the "Utilities" folder Locate "Boot Camp Assistant " And Double Click On it.

    *  Partition Your Drive to Create room Windows XP . Once Boot camp loads, a slider will appear. this lets you select the amount of harddrive space you wish to dedicate to the Windows XP and also  leave enough space to install windows other Applications.

    *  Click On the "Windows Installer " in Boot camp to start the Installation Process . When prompt by boot camp Assitant , Insert the Windows Xp CD and Start the Installation The macbook Restarts and launches the Windows XP Installer .

    * Select the Partition You wish to Format for Windows XP . the Boot Camp Assistant automatically will name this Partition "BOOT CAMP " Select Partition and Press Enter Key .

    * Now You Can Choose File Allocation Table or NTFS. the FAT format is only compaitable boot camp partitions of 32 Gigabytesand Less , While NTFS is Good More than FAT . When MAC OS X can only read files On a NTFS partition. Choose a Format And Press Enter Key

    * Finish the Windows XP Configuiration. Once you format the Drive,the Windows XP Installation Program will Copy necessary Files . When Prompted, Create a Windows XP Administrator account and log in .


    Don't Forget Say Me Thanks .
    @Sannidhey7


    WINDOWS XP INSTALLATION

    "HOW TO INSTALL WINDOWS XP ?"


    Windows XP is a Operating Systems . Computer Is a Machine but it has  an Own Language . Very Dificult to we understood its Language So Computer Needs OS . Operating System Understand Language of  Humanbeign and Machine .


    •            Insert A Wndows XP Disk In CD Drive . Then Press DEL Key And Go To BIOS Setting and Select A Boot Tab And Select First Boot Device As A CD ROM , now Press F10 Key And Save And Exit. Click Ok .Now You Have Shown the Black Color Screen And Shown A Message  "Reply From Inspecting your Computer 's Hardware Configuiration . . . " But Here Is One Condition You Have Press Any KEY before the Five Dots.


    •  Now open an Blue Color Screen Page With Name Of "WINDOWS SETUP " It Check Your System and Copy the all files.


    * Now You are Reached at Windows XP Professional Setup . That Screen Tell You  RECOVERY CONSOLE , QUIT , And Continue To The Windows "XP INSTALLATION CLICK ENTER KEY "


    * When You Pressed An ENTER KEY You Have Showned the " MICROSOFT LICENSE AGREEMENT PRESS "F8" KEY And Go Ahead .


    *Now You Have to Choose Where u Install the Windows XP ( Default C: Drive ) if u want Install Any Drive then u Can Select here . And u have Create & Delete Your Partition Here .


    * If u Wish to Change your File System then U can Select Your File System here (Pointt Of ViewMe USE NTFS )


    *  Now Copy New Files On Your Harddrive.

    * When the all Files Copied then Your Computer want to Restart.


    *When Your PC Restarted Then u Have shown the message " Reply From Inspecting your Computer 's Hardware Configuiration . . . " this time Dont press any key Otherwise you have to do reinstall the windows xp .  Now  you Have shown Normal window open type page .


         * Now You Can Show the "Windows XP" Installation Process .


    * Now You can Choose to Customized regional and language Setting that will be used by XP Click
    "NEXT" to Continue .


    * Now Enter Your Name and Organization Name (If u want Not Must Needed )


    * Now you have enter your cd product key


    * In the Next Dialogbox You can create your Computer name and  choose a Password .                                                           


    * Now you can set a date & time By your Country .


    * now you have shown XP Installation .


    * After installation process you have showned new dialogbox who told you how to  choose your Network Setting "CLICK ON TYPICALLY "


    *  Now Select "WORKGROUP" Click Next


    * Installation process Has been Continued ...


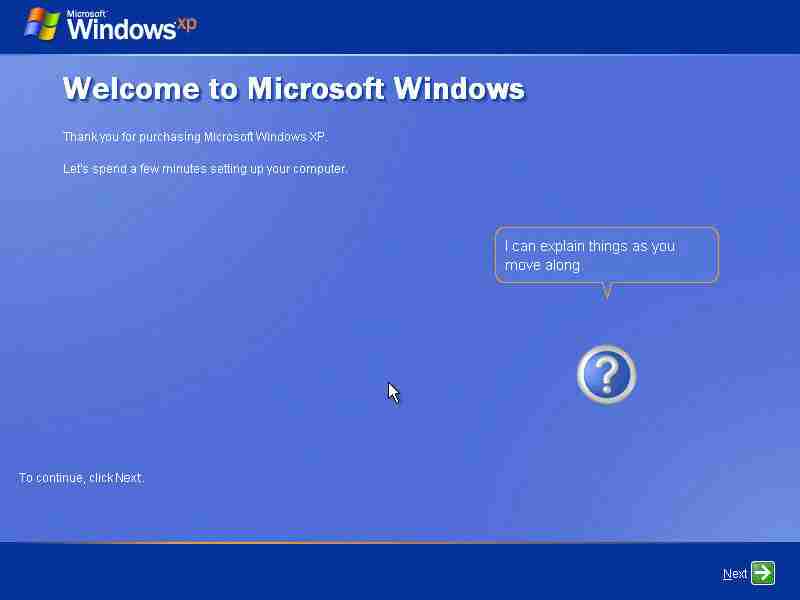
    * After Installation Process Your Computer Restarted Automatically and Splash a Windows Boot Screen .


    * Now You are Presented In the Windows XP


    * Now you Can Setup the New User name . At Least  1 Username Must be needed .


    * You have Finished your Windows XP Installation .. Enjoy With your New Operating System .


    * Now You Have Shown Your Desktop  .


    Don't Forget Say Me Thanks .

    @Sannidhey7